How to: Recover Campaign Progress
Última modificación:
Platform: PC-Steam
In certain cases of irrecoverable userdata corruption it may become necessary to restore your progress through the campaign.
This article provides instructions on how to restore your progress through the campaign by manually editing your profile.St
Prerequisites
- Programming Focussed Text Editing Software i.e. Notepad++
- You can use Notepad or Wordpad which are built into Windows but these will be less useful for editing purposes.
Step-by-Step
1. Open Windows File Explorer, you can do this by typing "File Explorer" into search and clicking the app
2. In the Address Bar type "%localappdata%low/brightrock games/Galacticare" and press the enter key, this will navigate to the Galacticare folder in your user profile's app data.
3. Create a backup of Player.Profile. For example by copy and pasting it to your desktop
- Right click on Player.Profile and click "Copy"
- On your desktop or elsewhere right click an empty space and click "Paste"
4. Right-click on Player.profile and open with your chosen text editing software.
5. Search the document for the word "_GalacticData"
- This can be done by using Ctrl+F find function on most text editing software
6. Launch Galacticare and reach the main menu (not the galaxy map)
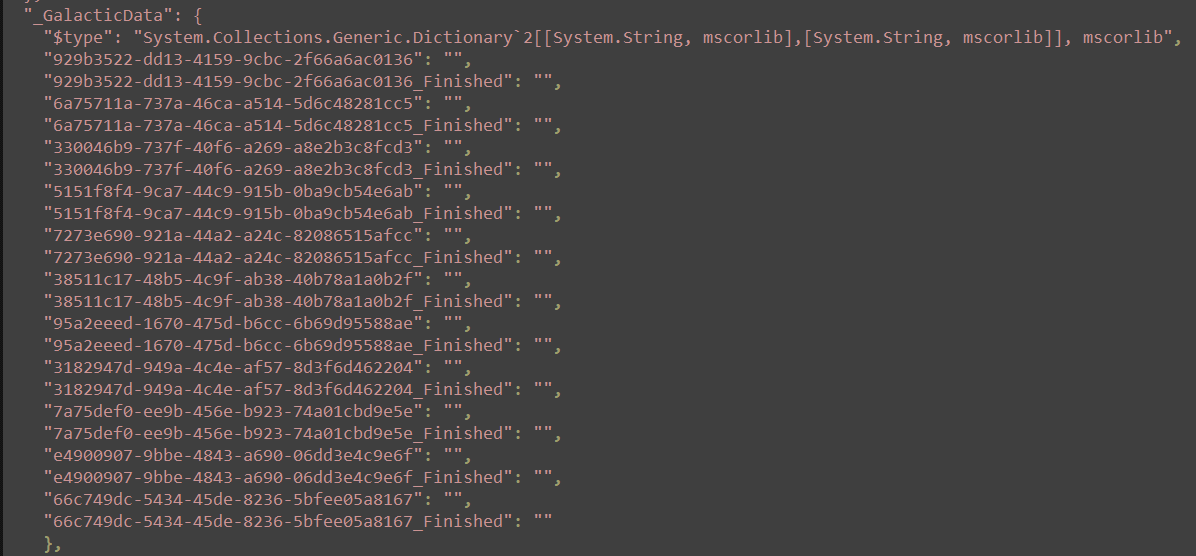
7. In your Player.Profile your _GalacticData section will look something like this:

- From the third line onwards each line represents data stored. By adding new data in here we can tell the game that we have completed various levels.
8. Add additional lines for each level complete.
- For each level you'd like to complete add the following replacing [level guid] with the GUID's below
- "[level guid]": "",
"[level guid]_Finished": "",
- "[level guid]": "",
- The level GUIDs are as follows:
- Chapter 1 : 929b3522-dd13-4159-9cbc-2f66a6ac0136
- Chapter 2 : 6a75711a-737a-46ca-a514-5d6c48281cc5
- Chapter 3 : 330046b9-737f-40f6-a269-a8e2b3c8fcd3
- Chapter 4 : 5151f8f4-9ca7-44c9-915b-0ba9cb54e6ab
- Chapter 5 : 7273e690-921a-44a2-a24c-82086515afcc
- Chapter 6 : 38511c17-48b5-4c9f-ab38-40b78a1a0b2f
- Chapter 7 : 95a2eeed-1670-475d-b6cc-6b69d95588ae
- Chapter 8 : 3182947d-949a-4c4e-af57-8d3f6d462204
- Chapter 9 : 7a75def0-ee9b-456e-b923-74a01cbd9e5e
- Chapter 10 : e4900907-9bbe-4843-a690-06dd3e4c9e6f
- Chapter 11 : 66c749dc-5434-45de-8236-5bfee05a8167
- For the last entry in your list remove the final comma that you added.
- A complete 11 chapter profile will look like this:
9. Save the file
10. Restart the Game
If everything has worked as intended then you should now have the levels you have netered the GUID for unlocked. If you receive an error restore your backup and try again.